Friday, May 28, 2010

Quick blackberry cobbler

First of all, I want to thank all of you who entered my first giveaway! And congratulations, again, to the winners.

Now, back to the cooking...though it almost feels wrong to even call this "cooking." Even after substituting fresh berries for the canned pie filling it calls for, this recipe is just too easy. Yes, even I fall prey to convenience foods on occasion (and although I’ve been meaning to make a homemade Bisquick mix, I haven’t yet). I whipped this up in a matter of moments one weeknight after finding a 99-cent sale on blackberries. (Psst...this is basically just the full-size version of my mini berry cobblers from way back when!)

3 cups blackberries
5 Tbsp raw sugar, divided
1 cup reduced-fat Bisquick
1 Tbsp Earth Balance, softened
1/4 cup soy or almond milk


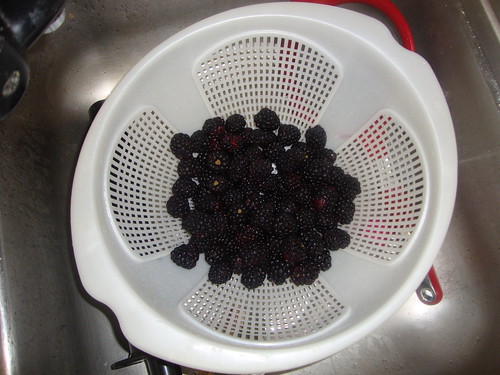
Rinse and drain the blackberries. In an 8- or 9-inch square glass pan, combine the blackberries and 1/4 cup (4 Tbsp) of the raw sugar, plus 3 Tbsp warm water.


Place the pan in a cold oven, then heat the oven to 400 degrees. Let heat for 10 minutes. Meanwhile, combine the last tablespoon of raw sugar with the Bisquick, margarine, and milk in a medium bowl, mixing until a soft dough forms.


Carefully remove the pan from the oven. The berries will be nice ‘n hot ‘n bubbly.


Drop the dough onto the warm berries in several spoonfuls; you can make it as neat or as rustic as you want. Sprinkle with additional raw sugar if desired.


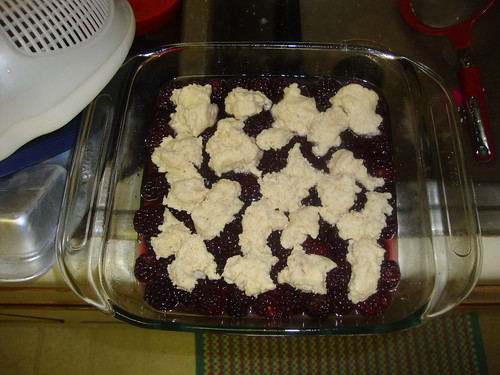
Bake for 14-16 minutes, until the topping is golden brown. Remove from the oven and let cool at least 15 minutes before serving. I like it best when it’s still warm, but leftovers are great too. If only I’d had some nondairy vanilla ice cream to serve it with!


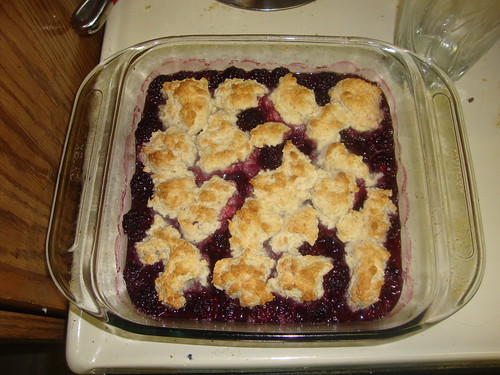
Yield: 6 servings. Per serving: 175 calories, 3.5g fat (1g sat), 33.7g carbs, 4g fiber, 2.3g protein.

If you like this, you might also like...
Mini berry cobblers
Homestyle blueberry cobbler
Pineapple upside-down cake

Stumble Upon Toolbar

Tuesday, May 25, 2010

Nut milk bag giveaway winners!

The time has come! I was thrilled to see some lurkers emerge from the shadows to enter my first giveaway, as well as, of course, my regular readers. Three Pure Joy Planet nut milk bags were up for grabs.

And the winners are...


McKella, Aimee, and Cheryl!
CONGRATULATIONS! McKella and Aimee, I’ll be leaving notification comments on your blog shortly, and Cheryl, hopefully you’re reading this and will contact me soon! Please email your full names and mailing addresses to me ASAP at amber4d (at) gmail (dot) com. I’ll pass those on to Pure Joy Planet and they’ll be shipping your new nut milk bags to you directly!


Thanks again to everyone who entered! If you didn’t win, remember that you can buy a nut milk bag of your own from Pure Joy Planet for just $8.88—and that includes shipping!

My goal in the coming months is to get to offer more and more fun stuff like this to my awesome readers :] So stayed tuned!

Stumble Upon Toolbar

Friday, May 21, 2010

Maple cinnamon pecan milk

If you’ve read my almond milk post (which you surely have, right?), you’ve probably already had a snicker (or two or ten) over the idea of nut milk, so I’ll spare you the dirty jokes here. Besides, we’ve got more important business to attend to than wisecracking nut-milking quips—a GIVEAWAY! More on that at the end of this post, but first, the star of the show: Maple. Cinnamon. Pecan. Milk. Need I say more? This is a riff on a recipe in Sarma Melngailis’ book Raw Food/Real World, and it’s fantastic.

1 cup raw pecans
3 3/4 cups water
1/4 cup maple syrup
2 tsp vanilla extract
1/2 tsp ground cinnamon
Pinch of nutmeg
Pinch of sea salt


Soak the pecans in a bowl of filtered water for 4-8 hours, or overnight.


Drain and rinse the pecans well and place them in a high-speed blender with 3 3/4 cups of cold filtered water.


Cover and blend on high for 1-2 minutes or until smooth. Pour the milk through a nut milk bag into a pitcher or large bowl.


Strain the milk through the bag, squeezing and twisting and wringing to extract as much as possible. Transfer the nut meat from the bag to a small container and refrigerate for later use (add it to other goodies like oatmeal, smoothies, cookie dough, and so on). Pour the milk back into the (rinsed) blender and add the maple syrup, vanilla, cinnamon, nutmeg, and sea salt (and, if you want to be really indulgent, a spoonful of coconut oil!). Cover and blend to combine. Taste for sweetness, adding more maple syrup if desired, then pour into a pitcher or other container for storage.


Smooth, silky, luxurious—this stuff’s liquid velvet. It’s so rich and creamy that it’s almost closer in texture to a thin milkshake than simple milk, and maple syrup + pecans + cinnamon is a [polygamous] marriage made in flavor heaven. Normally I’d suggest all kinds of uses for a milk like this, but honestly, I’ve yet to ingest it in any way besides simply drinking it from a glass. It’s that good.


Yield: about 1 quart. Per 1-cup serving: I’m not sure! There is no good way to calculate how many calories and fat/protein grams are left behind in the nut meat. Since pecans seem to leave less pulp in the bag than almonds, it’s a fair bet that there’s more fat, and therefore calories, left in the milk. My very rough estimate for 1 cup of pecan milk would be about 90-100 calories and 7-8 grams of fat.

Oh, you thought I forgot, did you? Hardly! I am ecstatic to present to you the first-ever
ALMOST VEGAN GIVEAWAY!
The wonderful folks over at Pure Joy Planet have offered to award one of their excellent nut milk bags to three, count ’em, THREE lucky winners! This is the very bag I myself bought and use, and it works like a charm—this pecan milk and my almond milk can attest to that! You can also use it to strain juices or make sprouts. It’s versatile, sturdy, easy to clean, and you can win one here!

HOW TO ENTER: Leave a comment below telling me your favorite kind of nut and how you like to eat it—raw, roasted and salted, as nut butter, in a baked good, in a stir-fry? Now, I’m no stranger to having a little naughty fun when talking about nuts, but let’s keep it family-friendly and limit it to TREE nuts ;] The deadline for entries is Tuesday morning, May 25th, at 9:00am CST (which is around 3pm that afternoon for anyone in the U.K. and midnight that night for those of you in Australia), and I’ll be choosing the three winners at random. Good luck, everyone! I can’t wait to see who will win!


If you like this, you might also like...
Homemade almond milk
Very berry "green" smoothie
Watermelon agua fresca

Stumble Upon Toolbar

Tuesday, May 18, 2010

April leftovers + exciting news!

It’s show-and-tell time again! These are some of my amassed restaurant meals and other random eats from the previous month. Also, a very exciting event is about to happen in Almost-Vegan-land—more on that later in this post!

First up is a Vietnamese tofu fried rice at Saigon 39 in Midtown.


I tried out the carrot cake loaf with cream cheeze swirl from the Baking Bites cookbook. I should’ve photographed the making of this one, because it came out amazing!


I took Matt to Blue Bird Bistro, a restaurant serving all local and organic food, for his birthday. Along with a bottle of locally made wine, we shared the hummus appetizer. The pita bread was made from scratch!


Blue Bird Bistro used to be vegetarian, but added sustainable meat and seafood back to its menu a couple years ago. My rare taste for seafood struck again—I splurged on the catch of the day, cornmeal-crusted catfish with jasmine rice and ratatouille.


Our (free!) dessert was a slice of apple crostata with vanilla bean ice cream. All in all, this was a great meal.


At NARA, I ate a vegetable roll, and Matt and I shared a flight of crisp white wines.


My friend Henry and I attended Urban Picnic 2010, a yearly event held by the Kansas City Originals, a coalition of independently-owned, local area restaurants. It was a giant, sold-out affair, with over 40 restaurants (plus six wineries and a brewery) giving out unlimited (and massive) samples of mouthwatering, gourmet food for four hours, along with live music, auctions, and raffles. It was a madhouse in there, so picture-taking was all but impossible, but I did get this shot of our desserts: strawberry shortcake, Italian cream cake, and lemon pound cake with macerated berries. I got so full I nearly felt sick, but I can’t wait till next year!


Matt and I ate at Bo Ling’s one Friday. I had forgotten my camera, so these two shots were taken on Matt’s iPhone. I had a huge plate of steamed veggies and tofu with brown rice, and a side of "brown sauce" for dipping.


Matt opted, all on his own, for tofu fried rice. Aww.


One Sunday morning, I made us "sausage-and-egg" breakfast sandwiches. I toasted and buttered ("Earth Balanced," rather) slices of Ezekiel bread. I seasoned slabs of extra-firm tofu with cumin, turmeric, and garlic salt, then pan-fried them. I also mashed some fennel seed and garlic salt into LightLife ground "sausage," formed it into patties, and pan-fried those too. Stacked together, these made an awesome savory brunch.


This is just a particularly pretty smoothie I had one weekday morning—predominantly blackberries.


VEGAN LASAGNA! I promise I will make this again one day and post it, but man was it a lot of work! I made it with from-scratch marinara sauce, homemade tofu "ricotta," whole-grain lasagna noodles, and a fake ground beef-fake sausage-white bean mixture. I chopped and threw on my last couple slices of rice mozzarella before baking.


This was a WINNERRR. I’m hungry just thinking about it.


Ok, ok! I get it, you want to hear the news. Well, here it is: this Friday will see the advent of an Almost Vegan first—a GIVEAWAY! I love when other blogs hold giveaways (despite never having won one), and I’ve wanted to have one here since I first started this blog nearly two years ago. The opportunity has finally arisen! I’m not going to tell you what the prize is, but I’ll offer one hint—it’s a product that (I’m guessing) most of you don’t own, but it will allow you to make at home a recipe recently featured here, as well as the recipe I’ll post Friday. Check back then for the chance to win!

Let’s see how many readers I can pull out of the woodwork with this one, mwahaha ;]
See you Friday!

If you like this, you might also like...
Long-winded March leftovers
Belated February leftovers
December-January leftovers

Stumble Upon Toolbar

Friday, May 14, 2010

Honey almond power bars

It must be power bar week! On Wednesday, Aimee posted some great-looking cherry energy bars, and here I am today with dried-fruit bars of my own. I bookmarked this recipe awhile back, and made it one morning before work—that’s how quick and easy it is. It’s one of those customize-at-will recipes; there are options for every single item on this ingredient list! Oats (old-fashioned or quick), almonds (use chopped walnuts or pecans instead), sunflower seeds (raw, salted, or honey-roasted), flaxseeds (whole or ground), sesame seeds (raw or toasted), cereal (puffed rice, kamut, or millet), dried fruit (add or substitute things like chopped dried cherries or apricots, goji berries, dark raisins, et al.), nut butter (almond, peanut, or cashew), sugar (raw/turbinado, sucanat, or brown), honey (use agave nectar or brown rice syrup instead), extract (vanilla or almond), and even the sea salt (just use good ol’ table salt).

Some people seem to think that an energy/power bar is the same thing as a protein bar, but they serve very different purposes. For an athlete, or anyone who runs marathons like me, it’s important to distinguish between the two. While protein bars can be good for recovery snacks or meal replacements, a power bar, or energy bar, is actually quite low in protein. It’s meant to be more of a carbohydrate delivery system, providing a mix of slow- and quick-release carbs to fuel workouts, balanced by small doses of fat (to slow digestion) and protein (to aid muscle recovery). So don’t look to a bar like this to keep you full for hours—eat one for a pre-workout energy boost instead.

1 cup old-fashioned rolled oats
1/4 cup sliced or slivered almonds
1/4 cup sunflower seeds
1 Tbsp flaxseeds
1 Tbsp sesame seeds
1 cup unsweetened whole-grain puffed cereal
1/3 cup dried blueberries
1/3 cup dried cranberries
1/3 cup golden raisins
1/4 cup creamy almond butter
1/4 cup raw (turbinado) sugar
1/4 cup honey
1/2 tsp vanilla extract
1/8 tsp sea salt


Preheat oven to 350 degrees. Coat an 8x8-inch baking pan with cooking spray. Spread oats, almonds, sunflower seeds, flaxseeds and sesame seeds on a rimmed baking sheet.


Bake until the oats are lightly toasted and the nuts are fragrant, shaking the pan halfway through, about 10 minutes. Transfer to a large bowl. Add the cereal, blueberries, cranberries, and raisins; toss to combine.


Meanwhile, combine the almond butter, sugar, honey, vanilla and salt in a small saucepan. Heat over medium-low, stirring frequently, until the mixture bubbles lightly, 2 to 5 minutes.


Immediately pour the almond butter mixture over the dry ingredients and mix with a spoon or spatula until no dry spots remain.


Transfer to the prepared pan. Lightly coat your hands with cooking spray and press the mixture down firmly to make an even layer (wait until the mixture cools slightly if necessary). Refrigerate until firm, about 30 minutes, before cutting into 10 bars.


Store the bars in an airtight container at room temperature, or refrigerate for up to a week or freeze for up to a month; thaw at room temperature. These are more delicate than storebought power bars, but I’m quite happy to exchange durability for wholesomeness in this additive- and preservative-free snack. They’re toasty, fruity, nutty, and conveniently grab-and-go!


Yield: 10 bars. Per bar: 202 calories, 7.5g fat (1g sat), 32.2g carbs, 4g fiber, 4.5g protein.

If you like this, you might also like...
No-bake almond butter balls
Oat crumble jam bars
Banana wheat germ muffins

Stumble Upon Toolbar

Tuesday, May 11, 2010

A vegan taste of Ethiopia

Last month, my friend Hillary (of The Anti-Chef) and I took a vegetarian Ethiopian cooking class through UMKC. It was held at, and taught by the owners of, Blue Nile Café, a wonderful restaurant in downtown KC’s City Market. I’ve eaten there several times over the years (when I can convince my friends to be adventurous), and it’s always been excellent.

After listening to a brief history of Ethiopia, we were led into the kitchen. As luck would have it, I wound up right by the stove, so I got a front-row seat to the action. First, we were introduced to the spices and flavorings. From the top: salt and turmeric, berbere (a complex spice mixture containing over a dozen ingredients), mekelesha (ground chile; VERY hot!) and garlic-ginger paste, and cardamom and Ethiopian green coffee beans.


We learned to prepare two dishes—misir watt (a red lentil stew) and atiklett watt (a cabbage, potato, and carrot stew). The misir watt began with onions, ginger-garlic paste, and berbere cooked in plenty of vegetable oil...


...while the atiklett watt began with onions, potatoes, carrots, and turmeric.


Dry red lentils were stirred into the misir watt base...


...while chopped cabbage was added to the atiklett watt.


As the watts cooked (and filled the kitchen with the most amazing spicy/garlicky aroma), we learned how injera is made. Injera is the pancake-like bread with which all Ethiopian food is eaten. It’s spongy and tangy-tasting, made primarily of teff flour (though Blue Nile uses a blend of teff and four other flours) and water, and the batter must sit out and ferment on the counter for three full days.


It’s cooked on a flat, non-stick surface by pouring the batter in a circular shape, starting on the outside and looping inward.


It's then covered and allowed to steam briefly. Each huge injera only takes about 30 seconds to cook.


We were given the chance to try it for ourselves. There I am, makin' injera like a pro. The consistency reminded me of crêpe batter. I did rather well, if I do say so myself.


In mere minutes, we'd made a giant stack of injera.


By then, the lentils were cooked through and the misir watt was perfectly thickened...


...and the potatoes in the atiklett watt were tender.


Some finishing spices (like cardamom and mekelesha) were added to both dishes, and they were complete. So we feasted! And ohhh man, it was DELICIOUS.


But where are the actual recipes? you may ask. Well, you’ll just have to check back here soon—I made the misir watt at home recently, and will be posting about it shortly. In the meantime, you can check out Hillary’s atiklett watt entry.
THANK YOU AGAIN to Blue Nile Café for putting on such a great class!


If you like this, you might also like...
Falafel night + V-Day dinner
Vegan Italian Valentine feast
A vegan taste of India

Stumble Upon Toolbar

Friday, May 7, 2010

Chickpea-chili veggie burgers

Can you believe I’ve never had a veggie burger on this blog? Then again, I’m not much of a burger person to begin with, so maybe it’s not that surprising. All I had to see, though, was the word "chickpea," and I knew this Urban Vegan recipe was for me. If you have any special kind of chili powder on hand, like ancho or chipotle, now’s the time to use it. If for some reason you don’t have chili powder at all, I’m betting this would also be good with paprika in its place. Maybe even garam masala, for an Indian chana-burger?! Ooh, I’ll have to give that a shot sometime...

15-oz. can chickpeas, rinsed and drained
2 Tbsp chopped roasted red pepper
1/2 medium onion, chopped
2 cloves garlic
3/4 tsp chili powder
1/2 tsp sea salt
2 Tbsp olive oil, divided
Pinch of cayenne pepper (optional)
2 slices stale whole grain bread, crumbled
Up to 4 Tbsp vegetable broth or water
Up to 3/4 cup old-fashioned rolled oats
6 whole grain buns, split and toasted
Burger toppings, as desired


Place the chickpeas, red pepper, onion, garlic, chili powder, salt, and 1 Tbsp olive oil in the bowl of a food processor. (I also threw in a teaspoon of my homemade vegan bouillon just to give it an extra herby kick, but it’s not required.) By the way, if you don’t have roasted red peppers on hand, or if you don’t want to open a jar for just 2 Tbsp, feel free to use raw red pepper.


Process, adding enough veggie broth or water to get the mixture smooth, scraping down the sides of the bowl as needed. Add the crumbled bread. (If you don’t have stale bread, just toast two fresh slices before crumbling.)


Process until fairly smooth, adding more broth or water if needed. Dough should be sticky but malleable. Transfer to a large bowl and add enough oats so that you can pick up the dough in your hands without it sticking (I actually ended up using just over 3/4 cup). Refrigerate the mixture for one hour.


Remove the dough from the fridge and form into six (big!) patties. Heat 1/2 Tbsp olive oil in a large skillet over medium heat. Add three patties and cook, turning once, until each side is golden (probably 5-6 minutes total). Transfer cooked burgers to a plate, heat the other 1/2 Tbsp olive oil, and cook the three remaining patties.


Serve on toasted buns (or lettuce leaves) with any accoutrements you wish. Fries would be the natural choice for a side dish, but I made a warm corn-and-pea salad and savory pesto muffins as accompaniments. I ate my burger with black olive tapenade, making it feel kind of Italianesque (some Tuscan white bean dip would do the same trick). Topped with salsa or guacamole, this could become una hamburguesa mexicana. If you try my garam masala suggestion, I’d have it with Indian spice hummus. Or you can go the classic ketchup and mustard route; it’s up to you!


Yield: 6 patties. Per patty (without bun): 192 calories, 6.7g fat (1g sat), 28.6g carbs, 5g fiber, 5.6g protein.

If you like this, you might also like...
Tidy joes (vegan sloppy joes)
Roasted potato wraps w/black bean hummus
Curried tempeh-mango salad

Stumble Upon Toolbar