Wednesday, January 28, 2009

Tofu parmigiana alla marinara

Did you ever like chicken parmesan? I didn’t. I just never found anything appealing about a bland slab of chicken, covered with a thick coating of crumbly bread scraps, fried until completely saturated with grease, and adorned with a soggy, viscous mass of fatty, slimy cheese. (I’m sure there are people out there to whom that sounds delectable. I pity them.) No, to me, chicken parmesan was just a sad way to ruin the perfectly good pasta that tends to come served beneath it.

What does sound promising, however, is the looser concept of a seasoned and cooked protein paired with a pasta and topped with a rich marinara sauce—which brings us to this delightful recipe, another winner from my favorite magazine. I kept the original spirit, but made it a little easier and a bit more flavorful. One simple swap made it instantly vegan.

8 oz. whole wheat spaghetti
14-oz. pkg extra-firm tofu, rinsed
1/4 cup plain dry breadcrumbs
1 tsp Italian seasoning
1/4 tsp garlic powder
1/4 tsp salt
5 tsp olive oil, divided
1 onion, diced
1 carrot, peeled and finely shredded
2-4 cloves garlic, minced
1+ cup marinara sauce (storebought or homemade)
6T vegan mozzarella (optional)
2T chopped fresh basil or parsley (or 1 tsp dried)


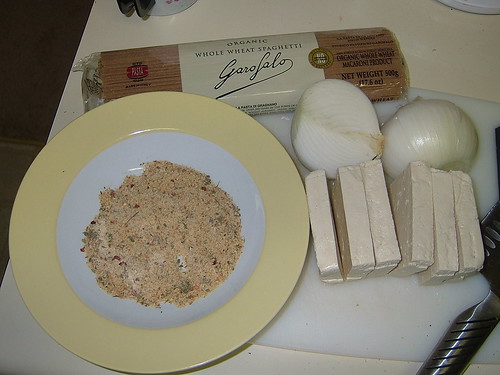
Cook the spaghetti according to package directions; drain when done. Combine the breadcrumbs, Italian seasoning, garlic powder, and salt in a shallow bowl. (Alternatively, just use Italian-seasoned breadcrumbs.) Cut the tofu crosswise into six “steaks” and pat them dry. Dredge both sides of the tofu in the breadcrumb mixture.


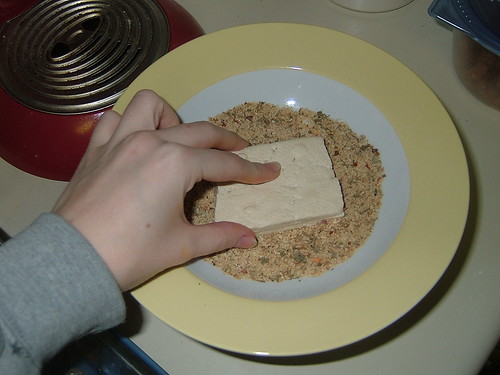
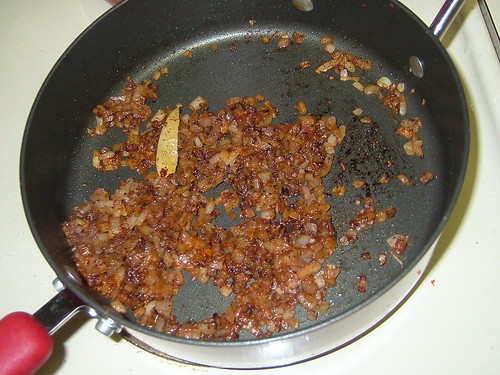
Heat 2 tsp oil in a large nonstick skillet over medium heat. Add the onion and cook until softened, about 3 minutes. Add the carrot and garlic, and cook and stir for another 2-3 minutes. Transfer the mixture to a bowl. Add the remaining 1T (3 tsp) oil to the pan and then add the tofu steaks.


Cook until browned on one side, about 3 minutes. Turn over and cook for 1-2 minutes more.


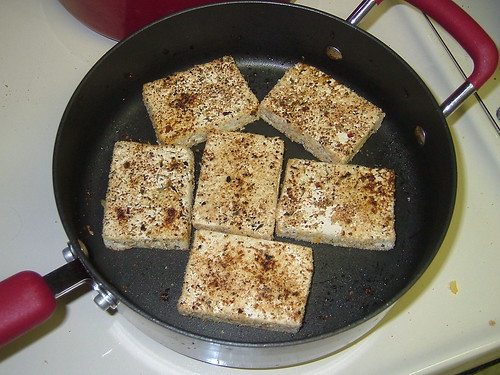
Spoon the onion/carrot mixture over the tofu.


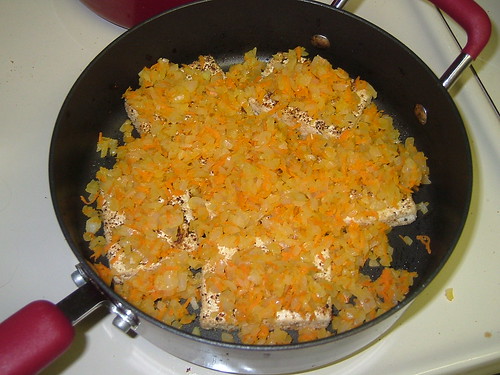
Pour the marinara on top and sprinkle 1T of the mozzarella on each piece (if desired—I could care less about cheese, but I admit it does look prettier this way).


Cover and cook until the sauce is hot and the cheese is melted, about 3 minutes. Remove from the heat and sprinkle with the basil or parsley.


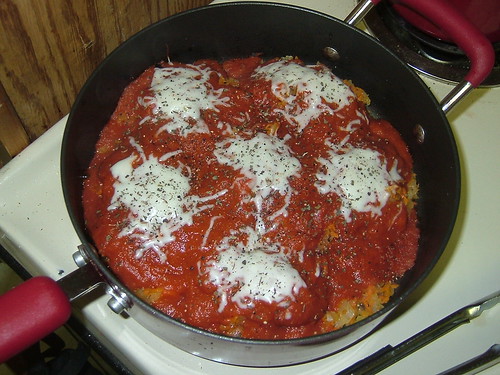
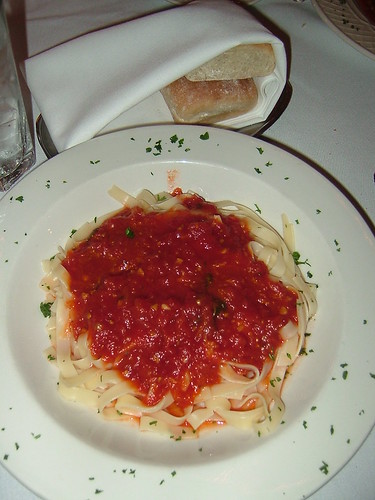
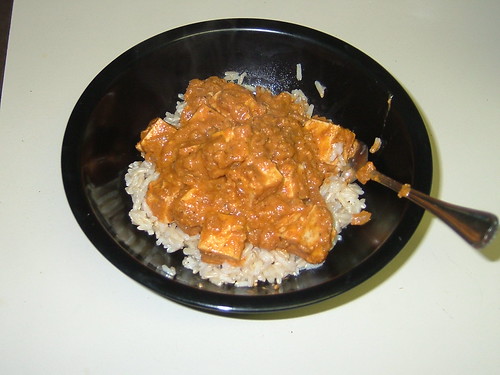
Serve each tofu steak atop a mound of spaghetti, spooning the extra sauce from the pan alongside.


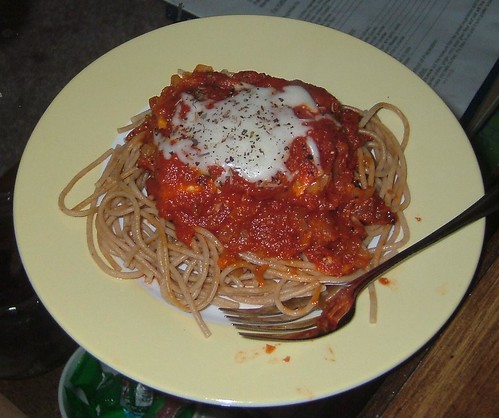
The tofu strikes that perfect balance between tender and chewy, the breadcrumb coating adds just the right amount of seasoning, and the marinara is marvelously livened up by the fresh vegetables. Those crazy carnivores can keep their foul, oil-drenched, saturated-fat-laden fowl. I’m too busy with this deliciousness to feel bad for them anymore.


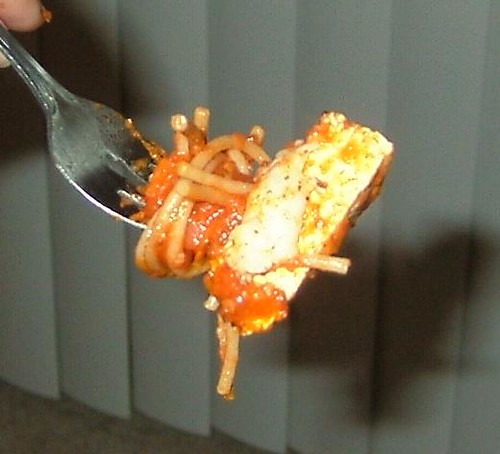
Yield: 6 servings. Per serving: 319 calories, 10.7g fat (1.7g sat), 40.7g carbs, 5.1g fiber, 18g protein.

If you like this, you might also like...
Spaghetti with tomato and peas
Tempeh bolognese
Vegan pesto pasta

Stumble Upon Toolbar

Friday, January 23, 2009

Peanut butter banana bread

This recipe comes courtesy of the Peanut Butter Boy, Nick. I’ve bookmarked a number of recipes in his archives, but this one really jumped out at me this week. And since tomorrow is National Peanut Butter day, what better way to celebrate?

I did alter the recipe quite a bit. First, and most obviously, I halved it. As a result, some measurements ended up funny, so I decreased the sugar just a tad, and added a touch of macadamia nut oil to replace the missing smidge of peanut butter. Since banana can actually be used as an egg replacer, I took out the egg and upped the amount of banana just slightly (which also made up for the small decrease in sugar). Vanilla soymilk stood in for milk, and finally, I used just a handful of peanut-butter-and-chocolate swirled chips instead of chopped dark chocolate. You can use those, or peanut butter chips, or chocolate chips, or a mixture, or chopped walnuts, or nothing at all...really, you can’t go wrong.

1 1/4 cups whole wheat pastry flour
3T white sugar
1/4 cup brown sugar, loosely packed
1 1/2 tsp baking powder
1/2 tsp salt
1/8 tsp cinnamon
2 medium ripe bananas, mashed
1/2 cup soymilk
1/3 cup peanut butter
2 tsp nut oil (optional)
1/2 tsp vanilla extract
1/3 cup chocolate or peanut butter chips


Preheat the oven to 350 degrees. Grease a 9x5 inch loaf pan. In a large bowl, combine the flour, sugars, baking powder, salt, and cinnamon. In a medium bowl, combine the mashed bananas, soymilk, peanut butter, oil, and vanilla.


This recipe is not only customizable, as demonstrated above, but forgivable as well. I only had one large banana instead of two medium, so I added about 1/4 cup of canned pumpkin puree to make up for it. Since I lost out on a little banana flavor that way, I also used my PB Loco Jungle Banana for half the peanut butter. I’m telling you, you really can’t go wrong with this.

Pour the wet mixture into the dry mixture and stir just until combined.


Gently mix in the chocolate/peanut butter chips.


Pour the batter into the pan...


...and bake for 45 to 50 minutes or until a toothpick comes out clean.


It’s not at all unusual for veganized baked goods like this not to rise very much (at least in my experience), so don’t worry that it’s rather flat. Allow it to cool for awhile before slicing it. I lasted about 10 minutes.


Once you taste this baby, you won’t care one bit how squat or stodgy the loaf is. Its texture is dense, chewy, and rich (not unlike that of my peanut butter bliss cake), with a moist peanut butter backdrop and the fragrant flavor of banana woven throughout. Positively heavenly.


Yield: 1 loaf (12 slices). Per slice: 175 calories, 6.6g fat (2.2g sat), 25.3g carbs, 2.9g fiber, 4.5g protein.

If you like this, you might also like...
Peanut butter bliss cake

Stumble Upon Toolbar

Tuesday, January 20, 2009

Creamy chickpea soup

I never really bothered to try cooking with dry beans. I know, everyone sings their praises and insists that canned beans pale in comparison, but the convenience factor is really invaluable (especially after I bought a case – yes, a case – of canned chickpeas from Wild Oats). That said, I’ve always intended to cook with dry beans when I had the time, the inclination, and the right recipe. So on Sunday, when I had several free hours, a craving for chickpeas (what else is new), and an enticing recipe from Mark Bittman’s How To Cook Everything Vegetarian that required dry beans in order to utilize the cooking liquid, I gave it a go. It’s 95% hands-off, but you will need a good 3- to 4-hour window of free time.

1 lb dry chickpeas
4 cloves garlic
1/4 cup tahini
1T lemon juice
2 tsp ground cumin
1/2 tsp cayenne pepper (optional)
Salt and pepper to taste
Paprika to garnish (optional)


FIRST, SOAK THE BEANS... Rinse the dry beans and put them in a large saucepan. Cover them with cold water by about two inches. Bring to a boil, uncovered, then turn the heat off entirely, put the lid on, and walk away for two hours.

NEXT, COOK THE BEANS... Drain the beans in a colander and put them back in the pot. Add two quarts (8 cups) of water (or sub vegetable broth for half the liquid). Bring to a boil again, uncovered, then turn the heat down to low, put the lid on, and walk away for 1-2 hours.


When you come back, it’s go time. Throw in the garlic, tahini, lemon juice, cumin, and cayenne. Blend until smooth, however you want—in batches in a food processor, in batches in a blender, or all once with a hand blender (easiest!).


So creamy! Sample a bite, and add salt and pepper till it tastes best to you. Ladle into a bowl, dust with a sprinkle of paprika, and enjoy. It’s velvety, filling, and nutritious, and it's even better the next day.


Yield: 6-8 servings. Per serving (6): 301 calories, 9.3g fat (1.2 sat), 42.6g carbs, 12g fiber, 14.6g protein.
Per serving (8): 226 calories, 7g fat (.9g sat), 32g carbs, 9g fiber, 11g protein


If you like this, you might also like...
Three-bean vegan chili
White bean garlic soup

Stumble Upon Toolbar

Friday, January 16, 2009

Vegan lemon bars

I am not a fan of citrus. I won’t touch anything orange, and I tend to be wary of lemon- or lime-flavored foods. That trepidation evaporates, however, when lemon or lime (but still never orange) marries with sugar in baked goods. Lemon poppyseed muffins? I’m there. Key lime pie? Count me in. Lemon bars?! Yes, please! I finally got around to trying the lemon bar recipe in Veganomicon, and I can now concur with everyone else that it is a jewel.

But boy, did I take some liberties. First, I lightened it up: I decreased the crust amount by 1/4 (thus the funny flour measurement), and I’m glad I did—mine still had more than enough crust, especially considering the amount of filling. Secondly, I substituted ingredients: whole wheat pastry flour for all-purpose in the crust, and cornstarch for arrowroot in the filling (but feel free to use the original ingredients called for). Thirdly, I altered the crust-making method: I made it by hand instead of with my food processor (too many dishes!). Finally, I adjusted the flavors to my taste by adding a pinch of salt, decreasing the sugar just a tad (2T), and using water in place of a portion of the lemon juice to tone down the citrus (more on that below). I won’t lie, these bars are pretty time- and labor-intensive, but just remember—patience is bitter, but its fruit (lemon, in this case) is sweet.

For the crust:
1 1/4 cup + 1T whole wheat pastry flour
1/2 cup (sifted) powdered sugar
3T cornstarch
3/4 cup Earth Balance


For the filling:
1 1/3 cups water
3T agar agar flakes
1 cup + 2T sugar
Pinch of salt
1/8 tsp turmeric
1/2-2/3 cup lemon juice
3T cornstarch
1T lemon zest (from 1 lemon)
1/4 cup soymilk


A couple tips...
– If you use Earth Balance in stick form, you can rub the empty wrappers on your baking pan to grease it.
– You can make the crust in a food processor by whirring the dry ingredients together and then pulsing in the Earth Balance.

Stir together the flour, powdered sugar, and cornstarch in a large bowl. Cut in the Earth Balance with a pastry blender until the mixture resembles coarse crumbs.


Dump the mixture into a greased 9x13 baking pan. Press firmly into an even layer with slightly raised sides to hold in the filling.


Refrigerate for 15-30 minutes. (I stuck with 15, since I was using a glass pan and after working in a dishroom in college, I am paranoid of cold glass dishes shattering when put into a hot environment.)

Preheat the oven to 350 degrees. Meanwhile, in a small saucepan, soak the agar in the water for 15 minutes. While it soaks, zest and juice the lemon. I got 1/3 cup of juice from my lemon, and I used bottled juice for the remainder, but you can juice two lemons if you want. I put “1/2-2/3 cup lemon juice” in the ingredient list because the recipe calls for 2/3 cup, but to make it less citrus-y, I measured out 1/2 cup and then added enough water to equal 2/3 cup. Use all juice for the 2/3 cup, though, if you want stronger lemon flavor. Mix the cornstarch into the lemon juice to dissolve.


Remove the crust from the fridge and bake for 20-25 minutes (mine took 22) or until golden brown. (See below for what to do while it bakes.) Remove from the oven and let cool.


While the crust bakes, turn the heat up on the soaked agar and bring it to a boil. Boil for about 10 minutes, or until the agar is completely dissolved. Add the sugar, salt, and turmeric and boil until dissolved, about 3 minutes. Lower the heat to medium and add the lemon juice/cornstarch mixture, then add the lemon zest and soymilk.


Whisk constantly until the mixture thickens, about 5 minutes. Pour the mixture into the prepared crust and let cool for 20 minutes.


Then comes the hard part: refrigerate the bars for at least 3 hours or overnight. Sadly, this recipe is lacking the instant gratification factor—no dough/batter/etc. to sample, no option to dig right in as soon as they’re done. But again, be patient. When you pull these out of the fridge later on or the next day, you’ll find a fully jelled pan of bars so atomically yellow it probably belongs in a Lisa Frank ad.


Slice these babies up, sift some powdered sugar on top, and enjoy. The crust is delicate and melt-in-your-mouth buttery. The filling is akin to lemon jell-o, but with a softer, more substantial texture. Though not identical to egg-based ones, these vegan lemon bars are delicious in their own right.


Ahh, sweet success.


Yield: 24 bars. Per bar: 117 calories, 5.6g fat (1.8g sat), 16g carbs, 1g fiber, .7g protein.

Stumble Upon Toolbar

Tuesday, January 13, 2009

Mini berry cobblers

I’ve been on a cooking hiatus lately. For one thing, I’ve been eating out quite a bit (enough that I’ll already have another random-restaurant-meals post up here very shortly). In addition, I had a dessert party at my place the day after Christmas, and it’s taken me till this week to eat the leftovers, which included cupcakes, fudge, peanut butter bars, and chocolate chip cookies. ::Rubs belly::

Last night, I finally got to bake something again. After all those fatty holiday sweets, I went the light-and-simple route, and made teeny blackberry cobblers. Actually, the amount below was meant to be one single-serving cobbler, but I didn’t have a dish the right size, so I divided it between two little custard cups. Use any berries you want; raspberries or blueberries would be great, but blackberries are my personal favorite. You can double this recipe to make two small or four tiny cobblers, or quadruple it and bake it in an 8x8 pan.

1 cup fresh or (thawed) frozen berries
1/4 cup Bisquick
1T soymilk
2 tsp sugar, divided
1/2 tsp Earth Balance, softened
Pinch of salt


Preheat the oven to 400 degrees. Toss the berries with 1/2 tsp of the sugar, and divide between two ungreased 4-oz. custard cups. (Alternatively, you can make the full batch in one 10-oz. custard cup.) Combine the rest of the ingredients in a small bowl.


Stir the crust ingredients together until a soft dough forms. Divide it in half and smoosh each portion into a flat round big enough to cover the berries (don’t worry if it’s not neat or perfect). Drape it over each pile of berries, and top with a sprinkle of sugar if desired.


Place the custard cups in another small baking pan to easily transport them to and from the oven. Bake for about 15 minutes, or until the crust turns golden brown.


Allow to cool for a few minutes, then dig in while they’re still warm. You can chomp away guilt-free—I ate both of my baby cobblers, and still took in less than 200 calories.


Yield: 2 mini cobblers. Per cobbler: 87 calories, 2g fat (.3g sat), 16.5g carbs, 2.1g fiber, 0g protein.

Stumble Upon Toolbar

Tuesday, January 6, 2009

December leftovers

Here’s where I round up of some of my random one-pic meals from last month.

My favorite Thai restaurant, Thai Place, has a fast-foodish version of itself called Wai Wai. It has many of the same dishes, but it’s faster, cheaper, and more casual. I almost always get the Thai cashew curry, with tofu, bell peppers, carrot, broccoli, and a smattering of buttery cashews.


Coincidentally, I found myself at the real Thai Place less than a week later. I realized I had never ordered the “original” Thai cashew curry there, so I tried the real deal. It’s what I expected (in a good way)—the same ingredients in a bigger portion, with a slightly richer sauce and an extra-big handful of cashews, for $12 instead of $7. Well worth it (at both places).


Sometimes I treat myself for breakfast, and instead of my usual Fiber One and soymilk, I have this: a Western Bagel alternative bagel (whole-grain and high-fiber and -protein) slathered with peanut butter (PB Loco Sumatra cinnamon spice, in this case) and topped with sliced banana and a drizzle of agave nectar.


My favorite Mexican restaurant in KC is Dos Reales, and I like to order the black bean enchilada platter with extra rice. I accidentally forgot to say “sin queso” this time, though, so I had to resort to picking off as much cheese as I could. Not perfect, but I did well enough, and oh man was it yummy.


Last week at Jasper’s, a pretty ritzy Italian place just across State Line, I ordered the tagliatelle alla marinara, and it tasted as good as it looks. Classic, elegant, light.


Finally, at Holy Land CafĂ© recently, I got the hummus and falafel plate. Just look at that thing – it’s gigantic! There’s nothing like a sprawling mass of extra-creamy chickpea goodness, flanked by crispy crunchy little orbs of chickpea goodness. Basically, there’s nothing like chickpea goodness.


Past leftovers...
November
October

Stumble Upon Toolbar

Friday, January 2, 2009

Tofu makhani curry

Happy new year! Hope everyone had a great Eve (how very fortunate that liquor is vegan). I’m looking forward to my first full year of food blogging, and all the delicious meals it will bring. My last cooking adventure of 2008 was an awesome one, and something I had been meaning to make for a long time.

Chicken makhani is an Indian dish that I would liken to chicken tikka masala, with the difference being that it’s even richer. “Makhani” means “butter,” after all (though it’s not the same dish as “butter chicken”...go figure). I based this recipe loosely off of one on Allrecipes that, in its original form, was nowhere near vegan – besides the obvious (chicken), it contained butter, half-and-half, and yogurt. But with a couple easy substitutions (and one particularly creative one), this dish adopted its new vegan identity effortlessly. The resulting meal is not just healthier, but is actually quicker and easier to make than the original.

1T canola oil
1 medium onion, diced
2T Earth Balance
2 tsp lemon juice
1 tsp garam masala
1 tsp chili powder
1 tsp ground cumin
1 bay leaf
1T ginger paste (or minced ginger)
1T garlic paste (or minced garlic)
1/4 cup ground almonds or cashews
1 cup plain soymilk or nut milk
1 8-oz. can tomato sauce
1/4 tsp cayenne pepper, or to taste
1 pinch salt
1 pinch black pepper
1 pkg. extra-firm tofu, cut into 1/2 inch cubes


A few tips...
- Ginger and garlic pastes are available at Indian grocers, and are well worth the trip. I was only recently turned on to them, and already find them indispensable. If you make a lot of Indian or Asian food, or if you just use garlic as copiously as I do, it can shave valuable minutes off your prep time.
- Ground almonds can be made by putting blanched whole almonds in a food processor and blending until they’re in the tiniest crumbs possible, but stopping before it turns into almond butter. (This is what will thicken the curry.)
- Get your basmati rice going before you start. (I use brown basmati.) Bring 1 cup rice and 1 3/4 cup water to a boil, then put the lid on, reduce the heat to low, and simmer for about 25 minutes.

Heat the oil in a large saucepan over medium heat. Sauté the onion until soft and translucent. Stir in the Earth Balance, lemon juice, garam masala, chili powder, cumin, and bay leaf. Cook and stir for 1 minute while breathing in that spicy, mouth-watering aroma.


Add the tomato sauce and cook for 2 minutes, stirring frequently. Stir in the soymilk, ground almonds, and ginger and garlic pastes. Season with salt and pepper to taste, throw in the tofu cubes and cayenne, and reduce the heat to low.


At this point, the sauce will be fairly thin.


Simmer it for about 10 minutes. The tofu will absorb a good amount of the liquid, and the ground almonds will thicken the sauce. Add water, about 2T at a time, if it condenses too much/too quickly. By the time your rice is done, your curry should look more like this:


Remove the bay leaf, and garnish it with cilantro if you’ve got it, or stir in some frozen peas, or enjoy it as-is. It’s thick, rich, and luxurious, filled with chunks of firm tofu and permeated by warm, indulgent spices. Now this is my kind of comfort food.


Yield: 3 servings. Per serving (without rice): 353 calories, 24.6g fat (3.6 sat), 10.6g carbs, 3.3g fiber, 20g protein.

If you like this, you might also like...
Indian & Moroccan at home
A vegan taste of India
Indian curried lentils

Stumble Upon Toolbar