Friday, February 27, 2009

Spaghetti with raw tomato sauce

I really admire people who eat a raw food diet. It sounds so cleansing and refreshing. I’d love to do it myself, even if just for a few days at a time, or for just a percentage of my intake. I have a few major problems, though. First of all, I hate leafy greens. That probably dooms me right there. Secondly, I don’t really like raw vegetables. I just don’t enjoy…the crunch (weird, I know). I prefer them warm and cooked. Last of all, there’s just no way I could let go of my precious beans and whole grains. I love them too much.

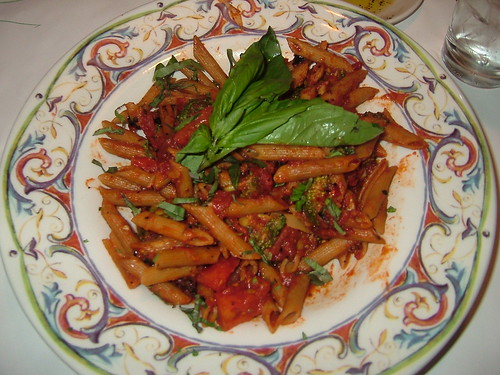
This dish combines, for me, the best of both worlds. (By the way, I got the idea from the unlikeliest of places—Rachael Ray’s magazine!) The pasta satisfies my complex-carb appetite, and the raw “sauce” is packed with flavor, a delightful combination of salty, savory, and sweet. This recipe is, in fact, one of the only ways I’ll eat raw tomatoes. Use your best oil and vinegar for this; since it’s a raw sauce, you’ll be able to taste all the subtle nuances in each.

1 lb whole wheat spaghetti
2 pints grape or cherry tomatoes, halved
1/3 cup olive oil
3T balsamic vinegar
2T soy sauce
2-3 cloves garlic, minced
1 bunch green onions, finely chopped
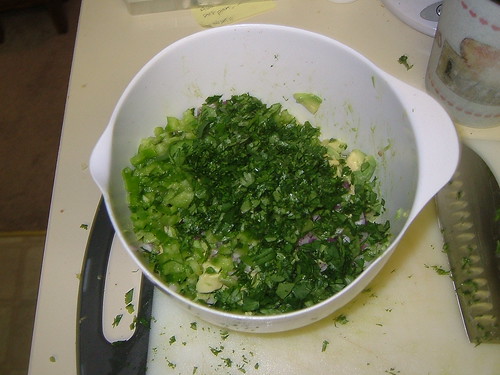
1/4 cup (packed) Italian parsley, minced


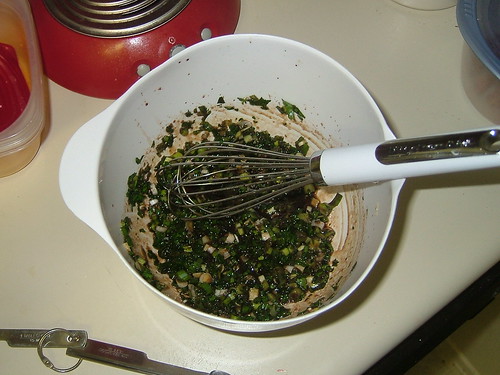
Cook the spaghetti according to package directions. Reserve at least 1 cup of pasta water (important!) when draining. Meanwhile, in a medium-size bowl, whisk together the olive oil, balsamic vinegar, soy sauce, and garlic.


Stir in the green onions and parsley.


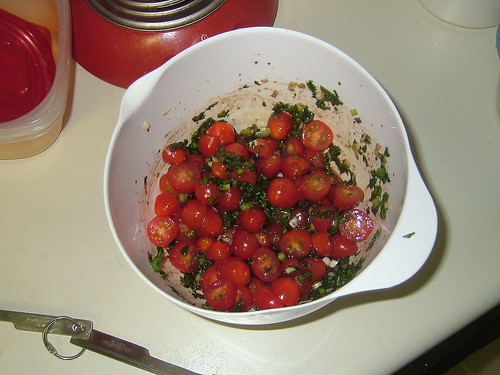
Add the halved tomatoes and toss to coat.


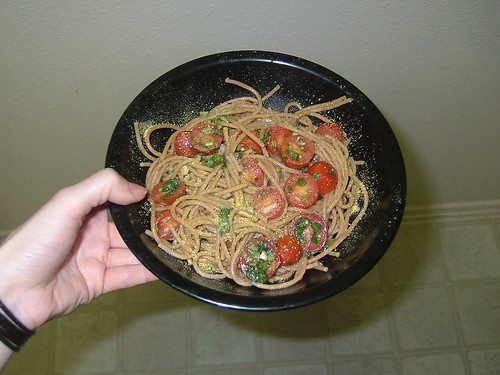
Put the drained spaghetti back in the pot, and pour in the tomato mixture.


Toss everything together gently with tongs, adding pasta water a little bit at a time. You want it to thin the sauce just enough that it coats all the pasta, but not so much that it waters it down. I ended up using somewhere between 3/4 and 1 cup.


I like to top this with a sprinkle of nutritional yeast and a healthy dash of fresh-ground pepper. By the time you sit down to eat, the sauce and tomatoes will have cooled off the spaghetti, and the spaghetti will have just barely warmed up the sauce and tomatoes. The result is a room-temperature dish, which is the perfect way to showcase all the fresh ingredients. I love how the deeper flavors of the oil, vinegar, and soy sauce are brightened up by the springy green onions, lemony parsley, and sweet, juicy tomatoes. Try and get a little bit of everything in each forkful, and savor the way every bite bursts across your palate.


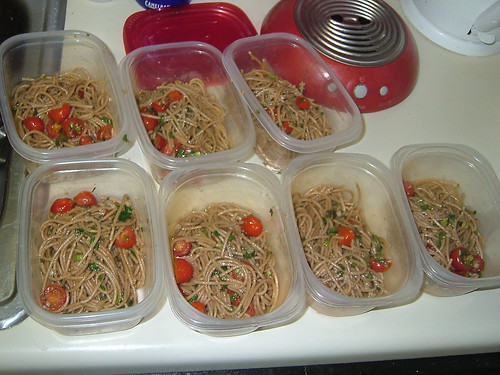
This makes six normal-size servings, but I like to stretch it out for the week’s lunches, so I divide it into eight. To bulk up the leftovers, I drain a can of (what else?) chickpeas and divide them among the containers. I also add a dash more pasta water to each, because the spaghetti will drink up the sauce as it sits. Feel free to add a drizzle more olive oil as well. I’ve eaten this cold straight out of the fridge and hot from the microwave, and it’s delicious both ways.


Yield: 6-8 servings. Per serving (6): 400 calories, 13g fat (2.2g sat), 63g carbs, 7.3g fiber, 12.1g protein.
Per serving (8): 300 calories, 9.8g fat (1.1g sat), 47.7 g carbs, 5.7g fiber, 9.3g protein.


If you like this, you might also like...
Tofu parmigiana alla marinara
Spaghetti with tomato and peas
Tempeh bolognese

Stumble Upon Toolbar

Tuesday, February 24, 2009

Pineapple upside-down cake

A few weeks ago, a woman at my work brought in a pineapple upside-down cake for a birthday party. I was in the lunchroom, minding my own business, doing my best to ignore the fruity aroma invading my senses, when I was offered a piece. Vegan it was not, but I had to try it. The cake was light and moist, the pineapple was soft and syrupy, and the brown sugar streusel topping really did it in. I’ve never had much of an opinion on pineapple upside-down cake—I could take it or leave it, and it had never entered my baking radar at all—but I knew then I had to make one myself soon.

Needless to say, the cake I tasted at work had sky-high amounts of fat and sugar. It was nice to have a few bites of, and it’s no secret I don’t mind ultra-richness and super-sweetness one bit, but I don’t really need anything that caloric tempting me in my own home. Though it didn’t have the buttery melt-in-your-mouth quality of the work cake, mine turned out quite tasty, and satisfied my craving just fine.

1 can of pineapple rings
1/4 cup canola oil
1 tsp vanilla
2T brown sugar
1 1/2 cups whole wheat pastry flour
1/4 cup sugar
1 tsp baking powder
1/2 tsp baking soda
Maraschino cherries (optional)


Preheat the oven to 350 degrees and grease a 9-inch cake pan. Drain the can of pineapple rings, pouring the juice into a bowl or measuring cup. Add the canola oil and vanilla to the pineapple juice. Lay out the pineapple rings on a plate to allow any extra juice to drain (add any drained juice to the juice-oil mixture).


Arrange the pineapple rings in the bottom of the cake pan, overlapping them slightly. Add a pitted cherry to the center of each ring, if desired, and sprinkle the brown sugar evenly over the pineapple. I didn’t have any cherries, but I had the juice remaining from an old jar—I knew I’d find a use for it someday! I drizzled the cherry juice (about 2T) over the pineapple before topping it with the brown sugar.


Mix together the flour, white sugar, baking powder, and baking soda in a large bowl. Add the wet ingredients to the dry ingredients, and stir to combine.


Pour the batter over the pineapple rings...


...and use a spatula to gently spread it to the edge of the pan.


Bake for about 45 minutes, or until the top is completely golden. It will start to look brown very early on, but don’t be fooled! The juicy pineapple at the bottom makes it take longer to bake than other cakes its size.


Cool the cake for at least 15 minutes, then run a knife around the edge to loosen it from the pan. Put a large plate upside down on top of the cake pan. Wearing oven mitts, flip the cake pan and plate over at the same time, so the cake lands on the plate.


Let the cake continue to cool as long as you can stand, then cut and serve.


This cake is a study in layers. The pineapple on top, saturated by the cherry juice and sweetened up by the brown sugar, melts right into the next layer, a moist stratum of tender cake soaked with pineapple juice. Below that, the cake is less dense, giving birth to airy crumbs with every stab of the fork, and it’s perched atop a dry base that supports and seals in everything above. It’s not too rich and not too sweet—the light, tropical flavor is just right.


Yield: 8 slices. Per slice: 210 calories, 7g fat (1g sat), 35g carbs, 3g fiber, 3g protein.

If you like this, you might also like...
Deep chocolate bundt cake
Peanut butter bliss cake

Stumble Upon Toolbar

Friday, February 20, 2009

Tuscan white bean dip

Quite awhile back, I made a promise to someday post my favorite white bean dip recipe, and at long last, here it is. It’s from Giada de Laurentiis’ first cookbook, and it’s the first recipe I made when I got it. For all intents and purposes, it’s white bean hummus, so it’s no wonder I zeroed in on it. The ingredient list is short and sweet, and everything comes together so simply that you’ll be amazed at the depth of flavor it attains. Use your best olive oil for this, because you’ll taste it in every bite. I bet it would be even better made with fresh cooked beans; let me know if you try it that way.

1 can cannellini/navy beans, rinsed and drained
2-4 cloves garlic, peeled
1/2 tsp salt
1/4 tsp black pepper
2T lemon juice
1/4 cup (packed) fresh Italian parsley
1/4 cup olive oil
Pita chips, for serving


Place the beans, garlic, salt, pepper, and lemon juice in the bowl of a food processor. Adjust the garlic to your taste—I put in four cloves, and the garlic flavor in the finished product was über-powerful. That’s how I like it, but if you want it subtler, feel free to use just a clove or two.


Pulse the food processor until everything is roughly chopped and combined. Add the parsley and pulse that in as well.


Pause to scrape down the sides of the bowl, then turn it on full blast. Stream the olive oil in through the top until the dip looks smooth but still thick.


With the motor still running, stream in water until the dip looks just a little thinner than you’d like it—it’ll thicken as it sits. Let the food processor run for about 2 minutes to purée it thoroughly, scraping down the sides again if needed.

As you can see, I went the quick route and ate mine with storebought pita chips, but I’d highly recommend you cut up some fresh pita, brush with olive oil, sprinkle with salt and pepper, and bake at 400 degrees for a few minutes until toasty.


Scrape the dip into a bowl, cover with plastic wrap, and place in the fridge for at least a couple hours to allow the flavors to meld and develop. When you take it out, you’ll be rewarded with an irrestistibly creamy and mouthwateringly aromatic snack. The buttery beans and the fruity olive oil lock together to form a supremely pleasing texture. Its mild green hue belies the zesty parsley essence within, and the garlic will kiss your every taste bud. Serve it with the pita chips, crackers, or vegetable crudités, or you can use it as a sandwich spread...but I won’t tell anyone if you sample some with a spoon.


Yield: about 8 servings. Per serving: 125 calories, 7g fat (1g sat), 12g carbs, 3g fiber, 4g protein.

Stumble Upon Toolbar

Tuesday, February 17, 2009

Vegan French silk pie

I can only think of one food item that I am really intimidated by: pie crust. I’ve read innumerable recipes, techniques, tips, and reassurances that “anyone can do it.” Nanny, my grandma, can make it with her eyes closed. Yet I can’t get over my gnawing paranoia. There are so many variables; how do I know everything will work? What if my ingredients aren’t the proper temperature? What if I add just a little too much water? What if my dough sticks or tears until it’s a raggedy mess? What if I overbake it, or it puffs up in the oven? What if it just tastes like cardboard?

I knew that sooner or later I’d conquer my doubts and give it a go, and that day arrived last week. I went the simplest (and unhealthiest) route, to save myself as much headache as possible, and made it an all-shortening crust. Once I get more comfortable with it, I’ll experiment with Earth Balance or canola oil, but this time I went for the least temperamental, though most overprocessed and mysterious, fat. But hey, it’s still vegan, and anyway, Nanny has always made her crusts exclusively with shortening. This is the richest and fattiest thing I’ve had on this blog yet, but after all, it was Valentine’s week. Chocolate was mandatory.

For the crust:
1 cup whole wheat pastry flour
1 cup all-purpose flour
1 tsp salt
1/4 cup cold water
3/4 cup shortening


For the pie:
1/2 cup firm silken tofu, at room temperature
3/4 cup sugar
1.5 oz bittersweet chocolate, melted and cooled
1 tsp vanilla
2T cocoa powder
1T Ener-G
1/4 cup warm water


Preheat the oven to 400 degrees. Combine the flours and salt in a large bowl. Take 1/3 cup of the flour and mix it together with the cold water in a small bowl to form a kind of paste.


Cut the vegetable shortening into the remaining flour with a pastry blender until crumbly. Add the flour and water mixture, and mix just until the dough is comes together. Divide it in half, and wrap one half in plastic wrap and freeze for later use. Heavily flour a work surface and flatten out the dough in a circle.


Roll with a rolling pin to about a 1/8-inch thickness.


Gently press into a pie plate. I have no good way to tell you how to do this. My dough tore and fell apart in several places. Truth be told, I came close to giving up. I arrived at the point of not caring how it looked, as long as it was in the pan in one mostly-homogenous piece. Trim the edges with a knife (as you can see, I trimmed pretty far, because my edges were not pretty) but don’t throw them away! Sprinkle them with cinnamon sugar and bake them in a separate pan alongside the pie. I loved eating those scraps when I was little.


Prick the crust lightly with a fork and put in pie weights or dry beans. I had neither, so I lined the crust with parchment paper and poured in dry rice. It actually worked! Bake for 10-15 minutes, or until golden brown, then set aside to cool.

Meanwhile, put the tofu and sugar in a blender and process until smooth.


Add the melted chocolate, vanilla, and cocoa powder and blend it again. Finally, add the Ener-G and warm water, and process until it’s as smooth as you can get it, scraping down the sides a couple times. Pour the beautiful chocolate goo into your cooled pie crust.


Lick the spatula when you’re done.


Put it in the fridge to chill, for several hours or overnight. Whenever you’re ready for smooth chocolate bliss, pull out your masterpiece, slice, and serve. Include some soy whipped cream, if you’ve got it.


So my pie crust wasn’t the prettiest. So I got frustrated a few times. So I dirtied a whole bunch of dishes and turned my kitchen into what looked like a war zone. It’s all good, because I am more than pleased with the result. The crust is surprisingly flaky, the filling is silky and rich, and the crust-to-chocolate ratio is, in my opinion, optimal. This was well worth the effort. Stay tuned, because I will be trying my hand at making pie again.


Yield: 10 slices. Per slice: 290 calories, 18g fat (6g sat), 31g carbs, 4g fiber, 5g protein.

Stumble Upon Toolbar

Friday, February 13, 2009

Black bean-avocado enchiladas

This is my take on Deena Kastor’s avocado enchiladas recipe that I found in Fitness magazine. Who is Deena Kastor, you ask? Well, she happens to be the fastest female marathon runner in America – ten minutes faster than anyone else – and the 2004 Olympic bronze medalist. However, since we mortals don’t run 100 miles a week, we don’t need the massive amounts of (good) fats present in her original recipe. The version in Fitness was already lightened up, but I took it further (and made it much more wallet-friendly) by reducing the amount of avocado and replacing it with beans and bell pepper, and of course omitting the cheese. One thing I couldn’t feasibly do is halve the recipe—with so many canned goods and whole vegetables, it would have wasted far too much food. So no matter how long it takes me, I will be eating every last one of these babies. I’ve got no complaints, and you won’t either.

1T canola oil
1 small (or 1/2 large) yellow onion, diced
2+ garlic cloves, minced
1T sugar
4T ground cumin
3T dried oregano
1/2 tsp cayenne pepper, optional
28-oz. can crushed tomatoes
1 can or bottle of beer
1 cup water or vegetable broth
1T balsamic vinegar
3 ripe avocados, peeled, seeded, and chopped
Juice of 1 lime
1 can black beans, rinsed and drained
1 cup cilantro, chopped
1 small (or 1/2 large) red onion, diced
1 small green pepper, diced
1 jalapeño, seeded and diced
3/4 tsp salt
20 corn tortillas


Heat the oil in a large saucepan over medium heat. Add the yellow onion and sauté for 5 minutes. Add the garlic, sugar, cumin, and oregano and sauté for 2 minutes.


Add the tomatoes, beer, and water or broth, turn the heat to low, and simmer for 20 minutes.


Meanwhile, preheat the oven to 400 degrees. Scoop out and chop the avocado flesh...


...toss right away with the lime juice, and then add in the beans, cilantro, red onion, green pepper, jalapeño, and salt.


Gently (you’re not making guacamole here) mix everything together with a large spoon. This filling would also be amazing mixed with cooled cooked brown rice, or eaten plain as a dip for tortilla chips.


Add the balsamic vinegar to the simmered sauce and remove from the heat. Spread 1/2 cup sauce on the bottom of a greased baking dish. (I ended up using two dishes, a 9x13 and an 11x7, and they fit exactly 20 enchiladas.) Dip the tortillas in the remaining sauce to soften—I found the best way to do this is to submerge about four tortillas at a time in the warm sauce, and then fish each one out as needed with a pair of tongs. Spoon about 3T of the filling onto each tortilla, one at a time, and roll them up gently.


Arrange them in rows, seam sides down, in the baking dish(es). Spoon some extra sauce over the top, but be sure to save some sauce for serving.


Cover with foil and bake for 25 minutes. Remove foil and allow to cool for 10-15 minutes.


Spoon the reserved sauce on top, and serve plain or garnished with additional chopped cilantro. The tortillas drink up the sauce and become meltingly soft. The tender filling, though warmed throughout, retains the cool freshness of the cilantro and avocado. Thanks to all the luscious monounsaturated fat, these enchiladas are extra-satiating and -satisfying. Who even needs cheese?!


Yield: 20 enchiladas. Per serving (2 enchiladas): 308 calories, 12.6g fat (1.7g sat), 43g carbs, 12g fiber, 8g protein.

If you like this, you might also like...
Chilaquiles casserole

Stumble Upon Toolbar

Tuesday, February 10, 2009

Homestyle blueberry cobbler

I’ve never known exactly what to call this. I got the recipe from my mom, who got it from a neighbor, who got it from someone else, and it’s been passed down as a blueberry “cobbler.” When I think cobbler, though, I think of a sweetened mass of fruit sitting beneath either a pie-crust-type pastry or a biscuit-like drop-topping. I’m tempted to call it a coffee cake, but those I imagine with a crumbly brown sugar layer on top. It’s baked in a pie plate and cut into wedges, but it’s certainly not a pie. It seems like a cake of some sort, but it’s FAR moister, and it’s definitely not meant to be frosted. Is it a betty, clafoutis, grunt, pandowdy, slump? Can anyone help me out here?!

Whatever you want to call it, this recipe is ridiculously easy, naturally eggless, blessedly quick to throw together, and timelessly delicious.

1 cup whole wheat pastry flour
1 (scant) cup sugar
1 cup vanilla (or plain) soymilk
1T lemon juice
1/4 cup Earth Balance, melted
1 tsp baking powder
1 tsp salt
1 cup berries, fresh or frozen, any kind


Preheat the oven to 350 degrees and grease a 9-inch glass pie plate. Put the lemon juice in a measuring cup, and pour in the soymilk till it reaches the 1 cup mark. Set aside for at least 5 minutes—this will make “buttermilk.” Meanwhile, combine the flour, sugar, baking powder, and salt in a large bowl, and whisk together.


Melt the Earth Balance if you haven’t already. (Note: I have tried making this with canola oil instead, but for whatever reason, it just didn’t work right.) Pour the lemon juice-soymilk mixture and the melted Earth Balance into the bowl with the flour mixture.


Using a spatula (not the whisk), gently mix everything together until just combined. There will probably be lumps, which is a-ok. Pour the batter into the greased pie plate.


Now, break out the berries. Blackberries are by far my favorite berries to make this with; however, since I made something with blackberries rather recently, AND since blueberries were on sale a couple weeks ago, I defaulted to the berry of the original recipe. This is great with raspberries, too, and I’ve always wanted to try it with chopped apples and a dash of cinnamon.

Take your choice of berries and drop them into the batter. You can do it neatly and daintily, like I did, or you can just dump a pile of them in there; they’ll spread out anyway. Put as many or as few berries as you like; 1 cup is just a round suggestion.


If you have one of those pie-crust-protector-circle-things, I’d put that on there. If not, you may just want to check it halfway through and put some foil around the edges if they look too brown. The outside always cooks significantly faster than the inside, for me. Bake for 45 minutes, or until a toothpick comes out clean. Allow to cool at least 10-15 minutes.


Then simply slice and serve! It’s plenty sweet as-is, but you can dust it lightly with powdered sugar if you want. The blueberries will have burst during baking and permeated the cake with their juicy goodness. The cakey part is light, fluffy, and über-moist—and somehow even more so the next day. It’s great as dessert, breakfast, or just a snack. Call it whatever you choose, but do give this one a try. Perhaps you can even pass it along to someone in your own family.


Yield: 8-10 slices. Per slice (8): 206 calories, 6.3g fat (1.8g sat), 35g carbs, 3.1g fiber, 2.6g protein.
Per slice (10): 165 calories, 5g fat (1.5g sat), 28g carbs, 2.5g fiber, 2.1g protein.


If you like this, you might also like...
Mini berry cobblers

Stumble Upon Toolbar

Friday, February 6, 2009

January restaurant roundup

Tyler, Henry, and I finally tried the new Indian buffet Masalas a few weeks ago, and it completely won us over. It combined the best of both worlds—the seemingly limitless variety of a buffet, plus the quality of non-buffet food. Here I’ve got rasam (soup), uttapam, pappadum, veggie pakoras, chana masala, basmati rice, two mixed vegetable curries, masoor dal, and pulao (in the middle). And this was just my first trip to the buffet!


At Macaroni Grill, I ate the capellini tre pomodoro...kind of. I substituted whole wheat penne for the capellini, added broccoli, and asked them to go light on the oil and heavy on the garlic. It was a tomato-basil weeknight delight.


More Indian food! Tyler, Henry, and I have also fallen in love with Flavors of India (it’s quickly assumed a spot in our top three). Here, we’ve got Henry’s chana masala on top, my ghee-free dal makhani on bottom, and the mixed bread basket on the left—a piece each of naan, roti, aloo paratha, and garlic naan. I can practically smell this picture...heaven.


Here are some vegetarian spring rolls from Thai House. I love the way the sweet, tangy peanut sauce brightens up the cool, crisp, cilantro-spiked filling.


Also from Thai House is this excellent massaman curry, with tofu, potatoes, carrots, and peanuts. It was the perfect foil to the appetizer—the sauce is made thick and rich by peanut butter, coconut milk, and chile oil. The fluffy jasmine rice is a welcome way to cut the heavy curry and spread the flavors across the palate.


Finally, Brian, Brandon, and I got sushi last Friday at Jun in Prairie Village. Their vegetable roll (which I sadly neglected to photograph) was BIG and contained asparagus, yum. We all shared the tempura banana dessert, which was sooo greasy but so very good. It’s likely there was some egg in the batter, but oh well. The sweet strawberry drizzle made an unexpectedly perfect topping.


Past leftovers...
December
November
October

Stumble Upon Toolbar